
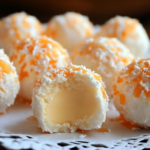
These No Bake Orange Creamsicle Truffles are a delightful treat that captures the nostalgic flavors of a creamsicle in every bite. Perfectly sweet, tangy, and smooth, these truffles make for a wonderful no-bake dessert that’s easy to prepare and sure to impress.
Why You’ll Love This Recipe
- Simple and Quick: No need for an oven! These truffles come together effortlessly in a few easy steps.
- Nostalgic Flavor: The orange-vanilla combination is reminiscent of a classic creamsicle.
- Perfect for Any Occasion: Whether it’s a holiday, birthday, or casual snack, these truffles are versatile and crowd-pleasing.
- Customizable: Easy to tweak with coatings or additional ingredients to suit your taste.
Ingredients
(Tip: You’ll find the full list of ingredients and measurements in the recipe card below.)
- Orange zest
- Orange extract
- Cream cheese
- Powdered sugar
- Vanilla wafers, crushed
- White chocolate, melted
Directions

- In a mixing bowl, combine softened cream cheese, orange zest, and orange extract. Mix until smooth and well blended.
- Gradually add powdered sugar and crushed vanilla wafers, stirring until a dough-like consistency forms.
- Scoop small portions of the mixture and roll them into bite-sized balls. Place the balls on a lined baking sheet.
- Chill the truffles in the refrigerator for 30 minutes, or until firm.
- Melt white chocolate in a microwave or double boiler.
- Dip each chilled truffle into the melted white chocolate, coating evenly. Allow the excess to drip off.
- Place the coated truffles back on the lined baking sheet and let the chocolate set.
- Optional: Garnish with extra orange zest or drizzle with additional melted chocolate for a decorative touch.
- Store in an airtight container in the refrigerator until ready to serve.
Servings and Timing
- Servings: Approximately 20 truffles
- Prep Time: 20 minutes
- Chilling Time: 30 minutes
- Total Time: 50 minutes
Variations
- Chocolate Coating: Swap white chocolate for dark or milk chocolate for a richer flavor.
- Citrus Twist: Substitute lemon or lime zest and extract for a zesty variation.
- Toppings: Roll the truffles in shredded coconut, crushed nuts, or colorful sprinkles before the chocolate sets.
- Vegan Option: Use dairy-free cream cheese and chocolate for a plant-based version.
Storage/Reheating
- Refrigerator: Store the truffles in an airtight container in the fridge for up to one week.
- Freezer: Freeze in a sealed container for up to two months. Thaw in the refrigerator before serving.
- Reheating: These truffles are best served cold and do not require reheating.
FAQs
What type of chocolate works best for coating?
White chocolate is traditional for creamsicle flavor, but dark or milk chocolate can be used for variation.
Can I make these ahead of time?
Yes, you can prepare the truffles up to a week in advance and store them in the refrigerator.
How can I crush the vanilla wafers?
Use a food processor or place the wafers in a resealable bag and crush them with a rolling pin.
Can I use orange juice instead of extract?
Orange juice can be used, but the flavor may be milder. Add more zest to compensate if needed.
What’s the best way to melt white chocolate?
Microwave in 15-second intervals, stirring each time, or use a double boiler for controlled melting.
Can I skip the orange zest?
Zest is key for the vibrant orange flavor. If unavailable, increase the extract slightly for a similar effect.
Are these truffles gluten-free?
They are not, as vanilla wafers contain gluten. Use gluten-free cookies for a gluten-free version.
How do I prevent the truffles from sticking?
Use parchment paper or a silicone mat when setting the truffles to avoid sticking.
Can I add food coloring to enhance the orange color?
Yes, a small amount of gel food coloring can be added to the mixture for a brighter appearance.
How do I prevent the chocolate from clumping?
Ensure the truffles are chilled before dipping and avoid overheating the chocolate.
Conclusion
No Bake Orange Creamsicle Truffles are a fantastic no-fuss dessert that will delight anyone with their creamy, citrusy taste. Easy to make and endlessly adaptable, these truffles are a must-try for any occasion. Make a batch today and savor the refreshing sweetness of these delightful treats!
PrintNo Bake Orange Creamsicle Truffles
No-Bake Orange Creamsicle Truffles are delightful bite-sized treats that combine the tangy flavor of orange with the creamy sweetness of white chocolate. They’re easy to make and perfect for any occasion. Here’s how you can make them:
- Prep Time: 15 minutes
- Cook Time: 2 hours
- Total Time: 2 hours 15 minutes
- Yield: 12 truffles 1x
- Category: Dessert
- Method: No-Bake
- Cuisine: American
- Diet: Vegetarian
Ingredients
- 1 cup white chocolate melting chips
- 1/4 cup unsalted butter
- Zest from 1 orange
- 3 tablespoons heavy cream
- 1/2 teaspoon orange extract
- A few drops of orange food coloring (optional)
- 1/2 cup confectioners’ sugar, divided
Instructions
- Prepare the White Chocolate: Place the white chocolate melting chips in a medium bowl and set aside.
- Infuse the Butter with Orange Zest: In a saucepan over medium heat, combine the butter and orange zest. Cook for about 1 minute to infuse the butter with the orange flavor.
- Add the Cream: Pour in the heavy cream and stir to prevent scalding. Continue stirring for about 2 minutes, allowing the mixture to combine fully.
- Melt the White Chocolate: Pour the butter mixture through a fine strainer over the white chocolate melting chips. Let the mixture sit for about a minute to melt the chocolate.
- Add Extract and Color: Add the orange extract and a few drops of orange food coloring to the melted chocolate. Whisk the mixture until the chocolate is mostly melted and smooth.
- Chill the Mixture: Cover the bowl with plastic wrap and chill the mixture in the refrigerator for 1-2 hours until it becomes firm enough to shape.
- Shape the Truffles: Divide the confectioners’ sugar between two small bowls. Scoop tablespoon-sized portions of the truffle mixture and roll them into balls.
- Coat the Truffles: Roll each truffle in one of the bowls of confectioners’ sugar, then place them on a cookie sheet. Once all the truffles are rolled, re-roll them in the second bowl of confectioners’ sugar.
- Set the Truffles: Place the truffles in the freezer for 20 minutes to set. Once set, transfer them to the refrigerator until ready to serve.
Notes
- For a fun twist, you can roll the truffles in colored sanding sugar or coconut flakes instead of confectioners’ sugar for extra texture.
- These truffles can be made in advance and stored in the fridge for up to a week.
- If the mixture is too soft to roll, you can add a little more white chocolate to help it firm up.