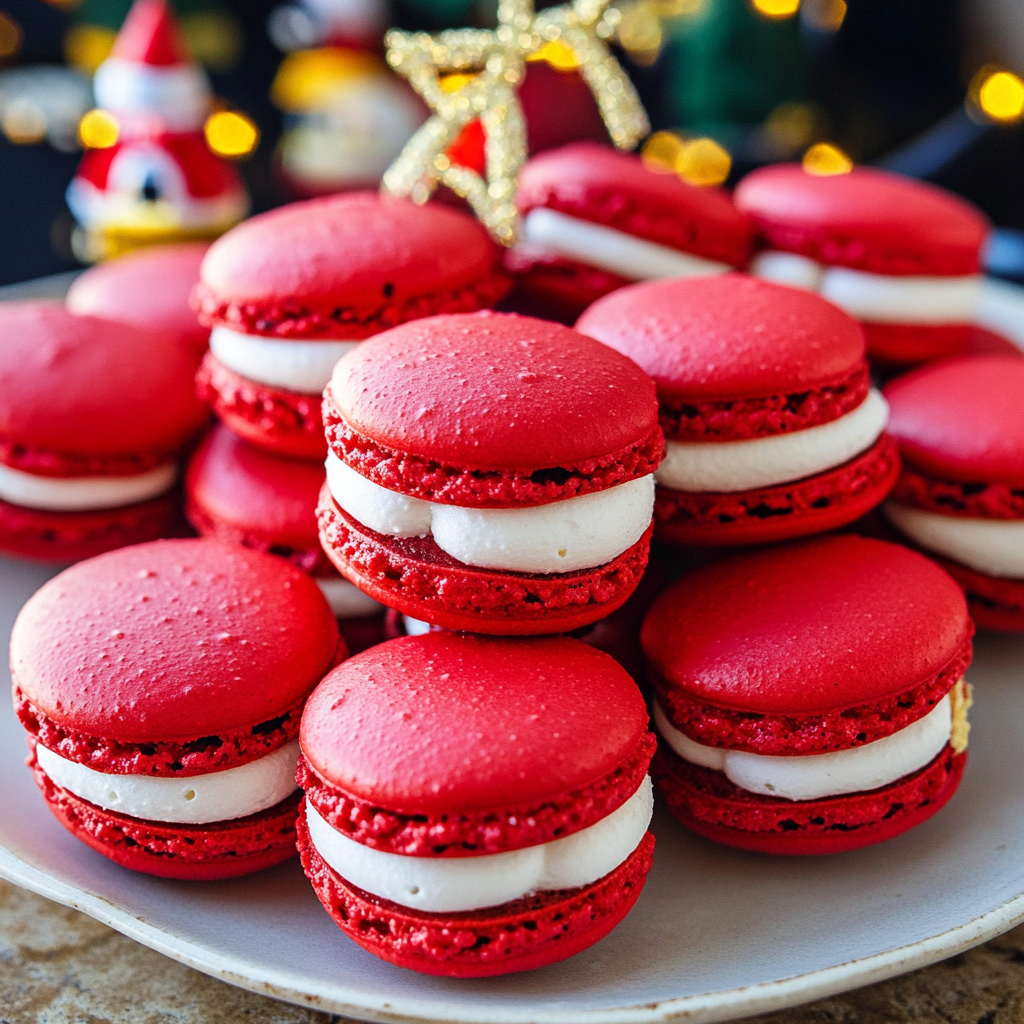
These delightful Santa Claus macarons are the perfect festive treat for your holiday gatherings. With their adorable design and delectable taste, they are sure to bring joy to anyone who tries them. These macarons combine the traditional delicate almond shell with a creamy filling and are decorated to resemble Santa himself, making them a standout dessert for Christmas.
Why You’ll Love This Recipe
- Festive and Fun: These macarons are decorated to look like Santa Claus, making them perfect for holiday celebrations.
- Delicious Combination: The almond-based macaron shells pair beautifully with the creamy filling of your choice.
- Customizable: You can experiment with different flavors and fillings to suit your preferences.
- Impressive Presentation: These macarons are a showstopper and make for great gifts or party favors.
Ingredients
(Tip: You’ll find the full list of ingredients and measurements in the recipe card below.)
- Almond flour
- Powdered sugar
- Granulated sugar
- Egg whites
- Cream of tartar
- Food coloring (red and white)
- Buttercream or ganache filling
- Edible markers or food gel for decoration
Directions
- Prepare the Macaron Shells:
- Sift the almond flour and powdered sugar together into a bowl to remove lumps.
- In another bowl, whip the egg whites and cream of tartar until foamy, then gradually add granulated sugar, beating until stiff peaks form.
- Fold the dry ingredients into the egg white mixture gently until the batter has a lava-like consistency.
- Add Food Coloring:
- Divide the batter into two portions. Dye one portion red for Santa’s hat and leave the other portion white.
- Pipe the Macarons:
- Using a piping bag, pipe circles for the Santa faces and triangles for the hats onto a baking sheet lined with parchment paper.
- Tap the baking sheet to release air bubbles and let the macarons rest for 30-60 minutes until a skin forms on top.
- Bake:
- Preheat the oven to 300°F (150°C). Bake the macarons for 15-18 minutes, rotating halfway through. Let them cool completely before removing them from the baking sheet.
- Prepare the Filling:
- Make a buttercream or ganache filling of your choice. Pipe the filling onto one macaron shell and sandwich it with another.
- Decorate:
- Use edible markers or food gel to draw Santa’s features on the macarons.
Servings and Timing
- Servings: Approximately 24 macarons
- Prep Time: 1 hour
- Cook Time: 18 minutes
- Total Time: 1 hour 30 minutes
Variations
- Flavor Options: Try different fillings like chocolate ganache, peppermint buttercream, or spiced cream cheese.
- Color Adjustments: Use additional food coloring to create different festive designs.
- Shape Ideas: Experiment with different holiday shapes like reindeer or snowflakes for added variety.
Storage/Reheating
- Storage: Store the macarons in an airtight container in the refrigerator for up to 5 days.
- Freezing: They can also be frozen for up to 3 months. Thaw in the refrigerator overnight before serving.
- Reheating: No reheating is necessary—macarons are best enjoyed at room temperature.
FAQs
1. Can I make these macarons without almond flour?
Almond flour is essential for the classic macaron texture, but you can experiment with sunflower seed flour as a substitute.
2. What type of food coloring works best?
Gel-based food coloring is recommended as it doesn’t alter the consistency of the macaron batter.
3. Why are my macarons cracking?
Cracks can result from under-mixing the batter or not allowing the shells to rest before baking.
4. How do I achieve stiff peaks in the egg whites?
Use room-temperature egg whites and beat them with cream of tartar until glossy and firm peaks form.
5. Can I make these macarons ahead of time?
Yes, macarons can be made ahead and stored in the refrigerator for a few days or frozen for longer storage.
6. What should I do if my macarons are hollow?
Hollow macarons may result from over-mixing or baking at the wrong temperature. Adjust your technique and oven settings.
7. How do I prevent my macarons from sticking to the parchment?
Ensure the macarons are fully baked and cooled before attempting to remove them from the parchment.
8. Can I use a different filling?
Absolutely! You can fill the macarons with jams, custards, or any buttercream of your choice.
9. Why aren’t my macarons shiny?
A dull finish might mean the batter was over-mixed or the oven wasn’t at the right temperature.
10. How do I store decorated macarons?
Store decorated macarons in a single layer in an airtight container to preserve the designs.
Conclusion
Santa Claus macarons are a delightful way to celebrate the holiday season with style and flavor. Whether you’re gifting them or serving them at a festive party, these adorable and tasty treats will be a hit. With a little practice and creativity, you’ll master the art of making macarons that look as good as they taste.
PrintSanta Claus Macarons
Santa Claus Macarons are delightful French confections, perfect for adding festive cheer to your holiday celebrations. These macarons feature vibrant red shells decorated to resemble Santa’s suit, complete with a black belt and yellow buckle, and are filled with a luscious sugar cookie buttercream.
Ingredients
For the Macaron Shells:
- 1 cup (100g) almond flour
- 1 ¾ cups (175g) powdered sugar
- 3 large egg whites, at room temperature
- ¼ cup (50g) granulated sugar
- Red gel food coloring
For the Sugar Cookie Buttercream:
- ½ cup (113g) unsalted butter, softened
- 1 ¼ cups (156g) powdered sugar
- ¼ cup (50g) granulated sugar
- ½ cup (63g) all-purpose flour, heat-treated (see note)
- 1 teaspoon vanilla extract
- ⅛ teaspoon almond extract
- ½ tablespoon milk or heavy cream
- ¼ cup (25g) desiccated coconut (for rolling)
For the Royal Icing Decoration:
- 1 ½ cups (187g) powdered sugar
- 1 tablespoon meringue powder
- 4 tablespoons water
- Black and yellow gel food coloring
Instructions
- Prepare the Macaron Shells:
- Line two baking sheets with parchment paper or silicone mats.
- Sift together the almond flour and powdered sugar to remove lumps.
- In a clean bowl, beat the egg whites until foamy. Gradually add the granulated sugar, continuing to beat until stiff peaks form.
- Add red gel food coloring to achieve a vibrant red hue, then gently fold in the sifted dry ingredients until the batter flows like lava.
- Transfer the batter to a piping bag fitted with a round tip. Pipe small circles onto the prepared baking sheets. Tap the sheets to release air bubbles.
- Let the piped macarons rest at room temperature for 30-60 minutes until a skin forms on the surface.
- Preheat the oven to 300°F (150°C).
- Bake the macarons for 15-20 minutes. Allow them to cool completely on the baking sheets.
- Prepare the Sugar Cookie Buttercream:
- Heat-treat the all-purpose flour by spreading it on a baking sheet and baking at 350°F (175°C) for 5 minutes. Let it cool completely.
- In a bowl, beat the softened butter until creamy. Add the granulated and powdered sugars, and beat until light and fluffy.
- Add the cooled flour, vanilla extract, almond extract, and milk or cream. Mix until smooth and well combined.
- Assemble the Macarons:
- Pair the macaron shells by size.
- Pipe a dollop of buttercream onto the flat side of one shell, then sandwich with another shell.
- Roll the edges of the filled macarons in desiccated coconut to resemble Santa’s fur trim.
- Decorate with Royal Icing:
- Prepare the royal icing by mixing powdered sugar, meringue powder, and water until smooth. Divide into two portions; color one black and the other yellow.
- Transfer each colored icing into separate piping bags fitted with small round tips.
- Pipe a black line across the center of each macaron to represent Santa’s belt. Allow it to set.
- Pipe a yellow square in the center of the black line to form the belt buckle. Let the icing dry completely before serving.
Notes
Heat-Treating Flour: To ensure safety when using raw flour in buttercream, spread the flour on a baking sheet and bake at 350°F (175°C) for 5 minutes, then let it cool completely before use.

