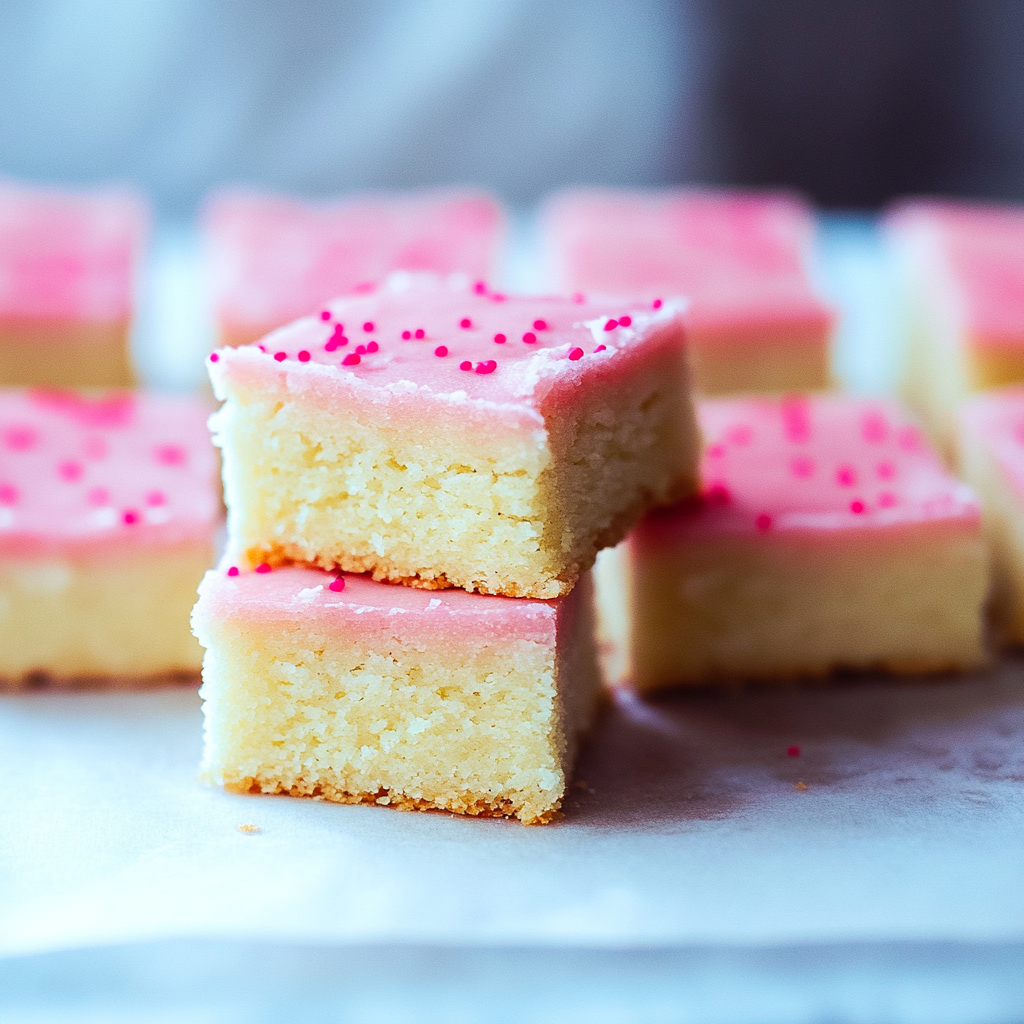
Sugar cookie bars are a delightful twist on the classic cookie. These bars are buttery, soft, and topped with a creamy frosting that melts in your mouth. Perfect for any occasion, they are simple to make and loved by kids and adults alike.
Why You’ll Love This Recipe
- Easy to Make: Skip rolling out dough and cutting individual cookies. These bars are baked in a single pan.
- Perfect Texture: Soft and chewy with a tender crumb, just like a sugar cookie should be.
- Customizable: Change up the frosting color or add sprinkles for holidays, birthdays, or special events.
- Crowd-Pleaser: Great for parties, potlucks, or as a sweet treat for the family.
Ingredients
(Tip: You’ll find the full list of ingredients and measurements in the recipe card below.)
- All-purpose flour
- Baking powder
- Salt
- Unsalted butter
- Granulated sugar
- Eggs
- Vanilla extract
- Almond extract (optional)
- Powdered sugar
- Heavy cream or milk
- Food coloring (optional)
- Sprinkles (optional)
Directions
- Preheat your oven to 350°F (175°C). Grease a 9×13-inch baking pan or line it with parchment paper.
- In a medium bowl, whisk together the flour, baking powder, and salt. Set aside.
- In a large bowl, cream together the butter and sugar until light and fluffy. Add the eggs one at a time, mixing well after each addition. Stir in the vanilla and almond extract.
- Gradually add the dry ingredients to the wet ingredients, mixing just until combined.
- Spread the dough evenly into the prepared pan. Use a spatula or your hands to press it into an even layer.
- Bake for 18–22 minutes, or until the edges are lightly golden and a toothpick inserted in the center comes out clean. Allow the bars to cool completely in the pan.
- While the bars cool, prepare the frosting by beating the powdered sugar, butter, and heavy cream (or milk) together until smooth and fluffy. Add food coloring if desired.
- Spread the frosting evenly over the cooled bars. Decorate with sprinkles if using.
- Cut into squares and serve.
Servings and Timing
- Servings: 24 bars
- Prep Time: 15 minutes
- Cook Time: 20 minutes
- Total Time: 35 minutes
Variations
- Frosting Flavors: Try cream cheese frosting for a tangy twist or chocolate frosting for a richer taste.
- Add Zest: Mix in a bit of lemon or orange zest into the batter or frosting for a citrusy kick.
- Festive Toppings: Use colored sugar or themed sprinkles to match the occasion.
- Gluten-Free Option: Use a gluten-free all-purpose flour blend in place of regular flour.
- Sugar-Free Version: Substitute granulated sugar and powdered sugar with suitable sugar alternatives.
Storage/Reheating
- Room Temperature: Store the bars in an airtight container for up to 3 days.
- Refrigeration: These bars can be kept in the fridge for up to a week. Bring to room temperature before serving for the best texture.
- Freezing: Wrap individual bars in plastic wrap and store in a freezer-safe bag for up to 2 months. Thaw at room temperature before serving.
FAQs
1. Can I make these bars ahead of time?
Yes, you can bake the bars and store them unfrosted for up to 2 days. Frost before serving for freshness.
2. Can I use salted butter instead of unsalted?
Yes, but reduce the added salt in the recipe by half to balance the flavors.
3. How do I prevent the bars from becoming dry?
Ensure you do not overbake them. Remove them from the oven as soon as the edges turn golden and a toothpick comes out clean.
4. Can I substitute almond extract?
You can omit it entirely or replace it with another extract, such as lemon or coconut, for a different flavor.
5. Are these bars suitable for freezing?
Yes, both frosted and unfrosted bars freeze well. Wrap them tightly to prevent freezer burn.
6. Can I double the recipe?
Absolutely! Use a larger pan, like a sheet pan, and adjust the baking time slightly.
7. What kind of sprinkles should I use?
Any sprinkles work! Use seasonal or themed sprinkles for holidays or events.
8. Can I add food coloring to the dough?
Yes, you can tint the dough with food coloring for a fun, festive look.
9. Is there a dairy-free option?
Yes, substitute butter with plant-based margarine and milk or cream with a non-dairy alternative.
10. What’s the best way to cut the bars neatly?
Use a sharp knife, and wipe it clean between cuts. For extra precision, chill the bars slightly before cutting.
Conclusion
Sugar cookie bars are a versatile and delightful treat that combines the ease of bar cookies with the soft, buttery flavor of classic sugar cookies. Whether for a casual snack or a festive celebration, these bars are sure to be a hit. Experiment with flavors, frostings, and decorations to make them uniquely yours!
PrintSugar Cookie Bars
These Sugar Cookie Bars combine the classic flavor of sugar cookies with the convenience of a bar. They’re soft, chewy, and topped with a generous layer of vanilla buttercream frosting and colorful sprinkles. Perfect for parties, holidays, or whenever you’re craving something sweet.
Ingredients
For the Cookie Bars:
- 1 cup (226g) unsalted butter, softened to room temperature
- 2 cups (400g) granulated sugar
- 4 large eggs, at room temperature
- 2 teaspoons pure vanilla extract
- 1/2 teaspoon almond extract (optional)
- 5 cups (625g) all-purpose flour
- 1 teaspoon baking powder
- 1/2 teaspoon baking soda
- 1/2 teaspoon salt
For the Frosting:
- 3/4 cup (170g) unsalted butter, softened to room temperature
- 3 cups (360g) powdered sugar
- 3 tablespoons heavy cream or milk
- 1 teaspoon pure vanilla extract
- Pinch of salt
- Food coloring (optional)
- Sprinkles, for decorating
Instructions
- Preheat Oven:
- Preheat your oven to 350°F (175°C).
- Line a 13×18-inch baking sheet (half-sheet pan) with parchment paper, leaving some overhang for easy removal.
- Prepare the Dough:
- In a large bowl, using an electric mixer, cream the softened butter and granulated sugar together on medium speed until light and fluffy, about 2-3 minutes.
- Add the eggs one at a time, beating well after each addition.
- Mix in the vanilla extract and almond extract (if using) until combined.
- In a separate bowl, whisk together the flour, baking powder, baking soda, and salt.
- Gradually add the dry ingredients to the wet ingredients, mixing on low speed until just combined. Avoid overmixing to ensure the bars remain tender.
- Bake the Bars:
- Transfer the dough to the prepared baking sheet, spreading it evenly to the edges with a spatula or your hands.
- Bake for 10-15 minutes, or until the edges are lightly golden, and a toothpick inserted into the center comes out clean. The bars should be soft but set.
- Remove from the oven and allow the bars to cool completely in the pan on a wire rack.
- Prepare the Frosting:
- In a medium bowl, beat the softened butter on medium speed until creamy, about 1-2 minutes.
- Gradually add the powdered sugar, 1 cup at a time, beating on low speed until combined.
- Add the heavy cream (or milk), vanilla extract, and a pinch of salt. Increase the mixer speed to high and beat for 3 minutes until the frosting is light and fluffy.
- If desired, add a few drops of food coloring and mix until evenly incorporated.
- Frost and Decorate:
- Once the cookie bars have cooled completely, spread the frosting evenly over the top using an offset spatula.
- Immediately add sprinkles over the frosting for decoration.
- Serve:
- Use the parchment paper overhang to lift the bars out of the pan and transfer them to a cutting board.
- Cut into squares or rectangles of your desired size.
- Serve and enjoy!
Notes
- Storage: Store the frosted bars in an airtight container at room temperature for up to 3 days or in the refrigerator for up to a week.
- Customization: Change the frosting color and sprinkles to match any holiday or event theme.
- Yield: This recipe makes approximately 24 bars, depending on how large you cut them.

